
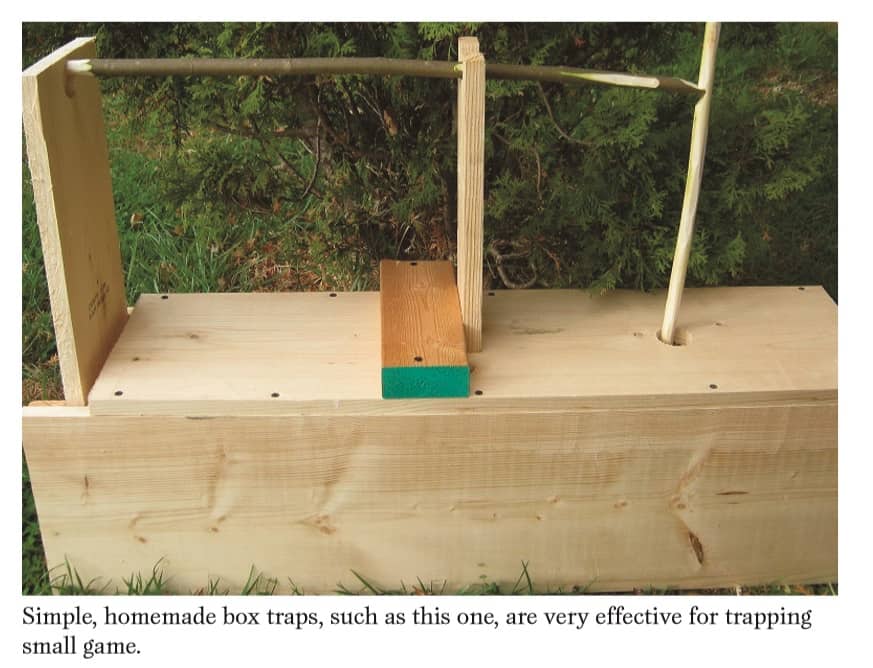
No doubt many of you have read about improvised traps in outdoor-survival books and thought, “That is a great idea. I could build that.”
Many of the designs shown in those books are ingenious. Some of them also work—after you practice building, setting, and using them.
After studying all those drawings, you might come away thinking that you need to learn how to construct every primitive trap ever invented. You might also assume that a homemade trap is somehow more effective than a commercially manufactured trap because it was carved from three twigs and held together with a strand of your own hair.
That is not the case.
Factory-made traps are usually more consistent, durable, and effective than improvised traps. They are produced to repeat the same action every time, and many have benefited from generations of trapper experience and improvements.
But homemade traps still have one major advantage:
They can be built from inexpensive, salvaged, or commonly available materials.
That is a big advantage during a long-term emergency when commercial traps, replacement parts, and money may be scarce.
The best approach is not to choose between primitive skills and modern equipment.
Use both.
Combine proven commercial traps with the ability to build traps from wood, wire, cordage, and other materials you can find locally.
Preparedness is about creating options, not limiting yourself.
Commercial Traps Still Have a Place
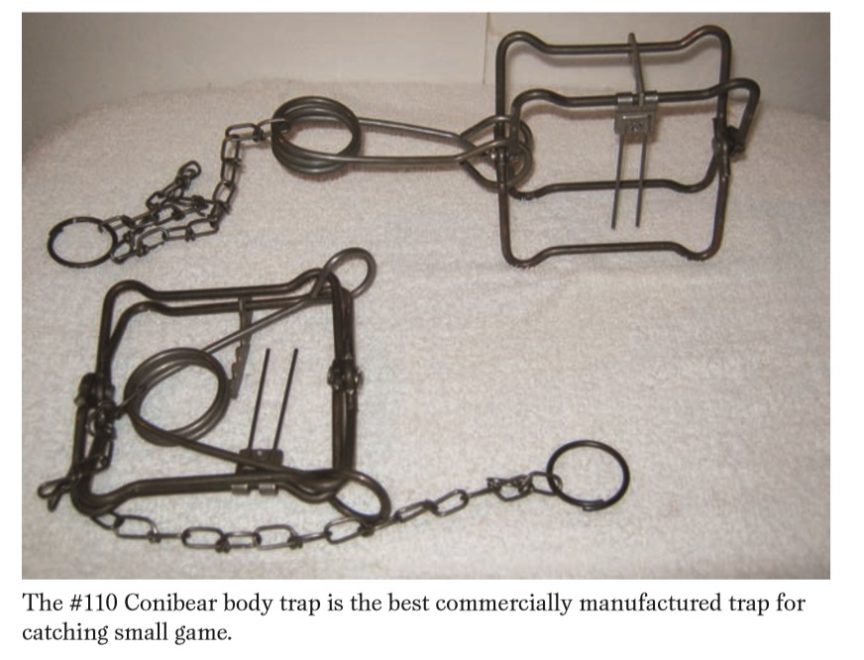
For trapping small game where legal and appropriate, I have long recommended keeping a supply of #110 Conibear-style body-grip traps.
Ten traps will give you a useful starting line. Twenty or more will provide considerably more coverage if trapping becomes an important food-gathering method.
Body-grip traps have several advantages:
- They are compact.
- They are relatively inexpensive.
- They are quick to set once you have practiced.
- They can be placed at trails, den entrances, runs, and other natural travel points.
- When correctly matched to the target species and properly set, they are designed to kill quickly.
They are also lethal traps.
A poorly placed body-grip trap can catch a pet or another non-target animal. Learn how to set, stabilize, conceal, and release the particular trap before placing it in the field.
Use only trap sizes and sets that are legal for your location and intended target species.
Commercial cage traps are another excellent option for nuisance animals around gardens, barns, chicken coops, and homes.
Havahart-style traps are light, effective, and ready to use, but buying several can become expensive. Larger models intended for raccoons, opossums, groundhogs, and similar animals may cost considerably more than small squirrel traps.
That is where the homemade wooden box trap becomes useful.
Why Build a Wooden Box Trap?
A wooden box trap can be built from:
- Scrap plywood
- Leftover boards
- Old shelving
- Pallet lumber that is clean and safe to handle
- Construction scraps you own or have permission to take
You should not trespass, steal lumber from construction sites, or take materials from abandoned buildings without permission.
For someone with basic tools and a little woodworking ability, box traps are:
- Inexpensive
- Simple to repair
- Easy to resize
- Useful for several species
- Capable of being built without specialized metalworking tools
- Less intimidating to construct than many primitive deadfalls and snares
A live-capture box trap can also protect the captured animal from dogs, coyotes, foxes, and other predators until you return.
However, a live trap is humane only when it is built correctly, placed responsibly, and checked frequently.
An animal left inside a trap during extreme heat, freezing weather, rain, or direct sunlight can suffer or die.
An Appalachian Skill That Is Disappearing
When I was growing up in the Appalachian Mountains of Tennessee, just about every country boy knew how to build a wooden box trap from scrap lumber.
It was the kind of thing children learned by watching their fathers, grandfathers, older brothers, neighbors, and friends.
Today, many children know everything about the latest video game but could not build a simple wooden box, sharpen a knife, grow a potato, or set a trap.
That is unfortunate.
One day, practical skills like these could make the difference between going to bed hungry and putting food on the table.
Even if you never need to trap food, a box trap can be useful for protecting:
- Chicken coops
- Rabbit hutches
- Gardens
- Fruit trees
- Feed storage
- Barns and outbuildings
Materials and Tools
The exact amount of material depends on the trap size, but a basic trap requires:
- Exterior-grade plywood or solid lumber
- A heavier board or plywood panel for the sliding door
- Narrow wooden strips for the door tracks
- Exterior screws or nails
- Wooden sticks or small branches for the trigger
- Strong cord, wire, or fishing line when required by the trigger design
Useful tools include:
- Tape measure
- Pencil
- Carpenter’s square
- Hand saw or circular saw
- Drill or screwdriver
- Hammer
- Utility knife
- Sandpaper
Screws generally make the trap easier to repair than nails.
Do not leave sharp screws, nails, splinters, or jagged edges protruding inside the box where they can injure a captured animal.
Choosing the Trap Size
The dimensions do not have to be exact. Build the trap according to the size of the animal you expect to catch.
Small-Game Box Trap
For animals such as squirrels, rabbits, muskrats, and mink, a practical starting size is:
- Approximately 24 inches long
- Approximately 6 inches wide
- Approximately 6 inches high
Larger Box Trap
For raccoons, opossums, and groundhogs, start with:
- At least 36 inches long
- Approximately 12 inches wide
- Approximately 12 inches high
A larger raccoon may require more room than you expect. The animal needs enough space to enter completely before touching the trigger.
If the trap is too short, the animal may remain partly outside when the door drops.
Single-Door or Double-Door Trap?
You can construct the trap with one sliding door or with a door at both ends.
Single-Door Design
For a single-door trap:
- Leave the front open for the sliding door.
- Close the rear permanently with plywood or boards.
- Place the bait and trigger near the rear of the box.
This forces the animal to enter completely before reaching the bait.
Double-Door Design
For a double-door trap:
- Leave both ends open.
- Build a sliding-door track at each end.
- Connect both doors to the same trigger when possible.
A double-door trap can resemble a natural tunnel, making some animals more willing to enter.
It is also more complicated to build and trigger reliably.
For a first project, I recommend building the single-door version.
Step 1: Build the Wooden Box
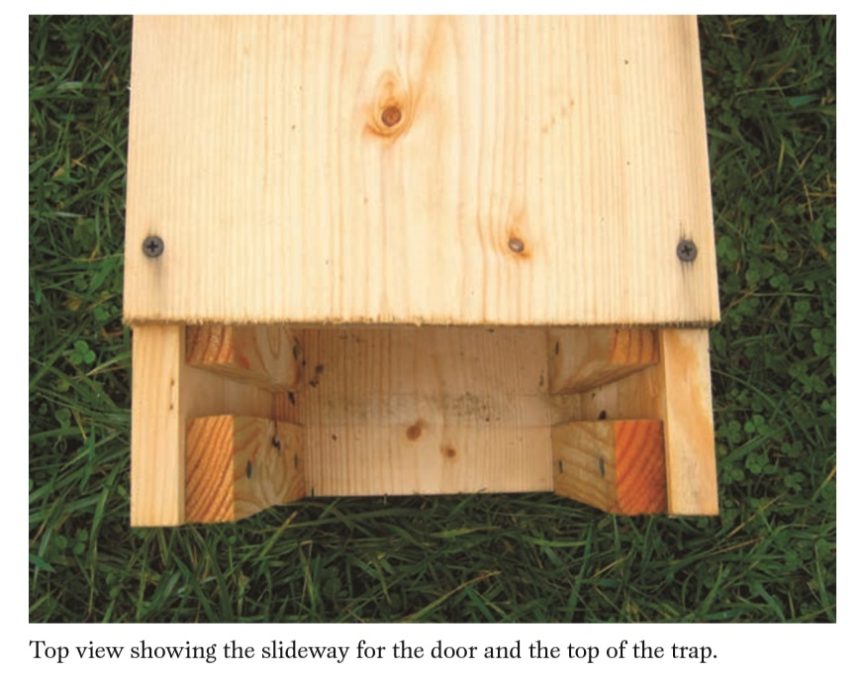
Cut a floor, two sides, a top, and a rear panel.
Assemble the floor and sides first, making sure the box remains reasonably square.
Attach the rear panel if you are building a single-door trap.
For the front door area, make the top panel approximately two or three inches shorter than the full box length. This leaves room for the sliding door and its guide tracks.
For a double-door trap, shorten the top at both ends.
The finished interior should be:
- Free of sharp points
- Large enough for the intended animal
- Strong enough to resist chewing and pushing
- Square enough that the door can fall freely
Do not worry about making the trap look like fine furniture.
It needs to be solid, functional, and dependable.
Step 2: Build the Sliding Door
The sliding door is one of the most important parts of the trap.
Use a strong piece of plywood or solid board that is slightly wider and taller than the entrance.
The door should:
- Move freely through its tracks
- Drop without binding
- Be heavy enough to fall quickly
- Extend below or beyond the opening far enough to prevent escape
- Fit closely enough that the animal cannot squeeze around it
Heavier wood helps the door close quickly and completely when the trigger releases.
Do not make it so heavy that the trigger cannot hold it in the raised position.
Step 3: Build the Door Tracks
Attach two narrow wooden strips vertically to the front of the box.
These strips form the channel through which the door slides.
The channel needs enough clearance for the door to move freely, but not so much that the door can twist sideways or jump out of the track.
Before building the trigger, raise the door and release it repeatedly.
It should fall all the way every time.
If the door sticks:
- Widen the track slightly.
- Sand rough edges.
- Check whether the box is twisted or out of square.
- Make sure screws or nails are not rubbing against the door.
- Remove swollen or warped wood.
A trap with a door that closes only half the time is not ready to be used.
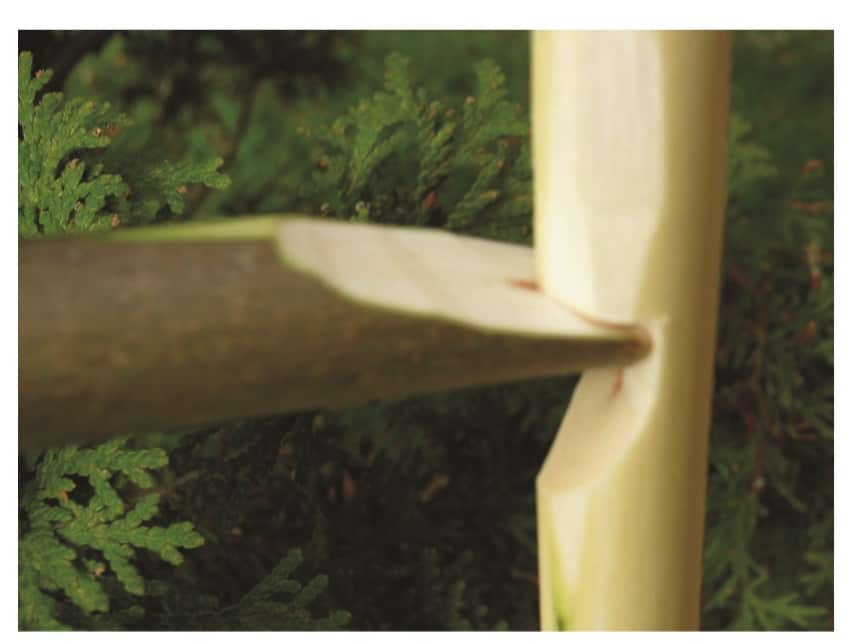
Step 4: Make the Trigger
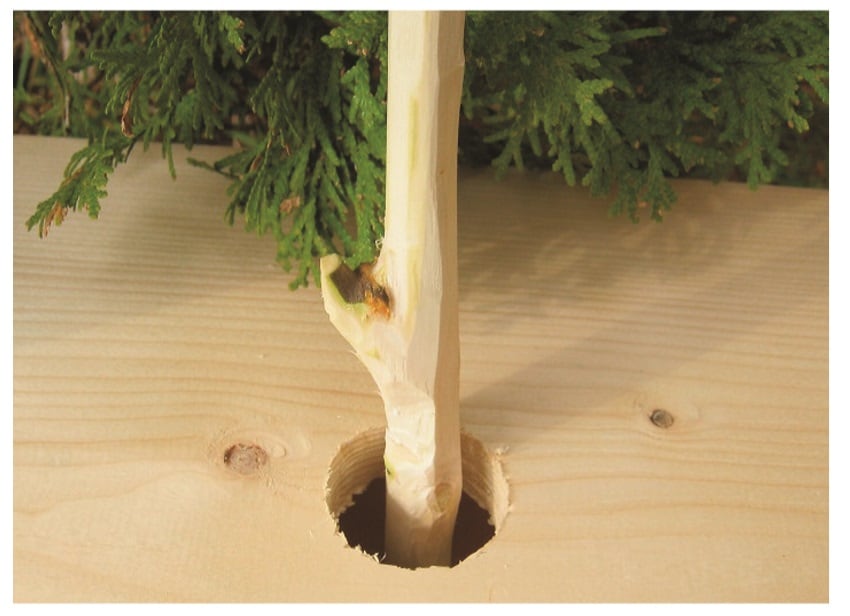
The trigger can be made from straight branches, wooden dowels, scrap lumber, wire, or other improvised material.
The basic trigger shown in the photos uses several pieces working together:
- A support piece that holds the door open
- A catch that keeps the support piece in position
- A trigger stick extending into the box
- A bait or contact point that the animal moves
When the animal touches the bait stick or trigger, the pieces separate, the support releases, and the door falls.
Explaining the exact relationship between the sticks is more difficult in writing than it is to understand from the photos.
The important thing is that the trigger:
- Holds the door securely against wind and minor vibration
- Releases when the animal moves the bait stick
- Does not require so much pressure that the animal steals the bait without tripping it
- Does not release so easily that a light breeze drops the door
Step 5: Test the Trap Repeatedly
Do not take the trap into the field immediately after driving the final screw.
Test it first.
- Raise the door and set the trigger.
- Tap the side of the box lightly.
- Make sure ordinary vibration does not release it.
- Move the bait stick with a long piece of wood.
- Watch whether the door drops completely.
- Try pulling or pushing the closed door from inside with a stick.
- Reset and repeat the test at least a dozen times.
Fine-tune the trigger by trimming, repositioning, or slightly reshaping the contact points.
Small changes in angle can make a major difference.
You want a trigger that is sensitive but not unreliable.
How to Set the Trap
Place the trap on stable, level ground.
If the trap rocks or twists, the door may bind.
Use dirt, leaves, thin boards, or flat stones to stabilize it when necessary.
Make sure:
- The door has a clear path downward.
- No stick, rock, brush, or leaf can block it.
- The trigger moves freely.
- The bait is positioned beyond the trigger.
- The entire trap cannot be rolled or dragged away easily.
For strong animals such as raccoons, you may need to stake, wire, or brace the trap so it cannot be rolled over.
Do not block ventilation completely when concealing the trap.
Bait for Different Animals
Most traps of this type are set with bait.
The best bait depends on the animal and what it is already eating in that location.
Raccoon
- Peanut butter
- Fish
- Sardines
- Fish scraps
- Marshmallows
- Sweet corn
Opossum
- Cut apples
- Peanut butter
- Pet food
- Fish
- Strong-smelling leftovers
Squirrel
- Acorns
- Corn
- Sunflower seeds
- Peanut butter
- Nuts
Rabbit
- Apple
- Carrot
- Cabbage
- Fresh greens
- Corn
Groundhog
- Apple
- Cantaloupe
- Leafy vegetables
- Sweet corn
When I am uncertain, I often start with a spoonful of peanut butter because many animals are attracted to it and it stays on the trigger better than loose bait.
Strong-smelling fish bait may attract domestic cats, so be careful where you use it.
Do not place bait where dogs, pets, livestock, or children can reach the trap.
Using Box Traps Around the Chicken Coop
Anyone who raises chickens knows how frustrating it is to watch good hens disappear one at a time.
The predator often comes at night and leaves little evidence beyond feathers, tracks, or a damaged section of fencing.
Likely chicken predators include:
- Raccoons
- Opossums
- Foxes
- Mink
- Weasels
- Skunks
- Domestic dogs
I have used wooden box traps against the outside walls of a chicken house.
Animals naturally travel along walls, fences, brush lines, and other edges rather than crossing the middle of an open area.
Place the trap so its entrance follows that natural travel route.
You can lightly conceal it with hay, grass, or brush to make it resemble a natural tunnel or opening.
Do not allow the camouflage to interfere with:
- The sliding door
- The trigger
- The door track
- Ventilation
- Your ability to see whether the trap is occupied
A trail camera can help identify what is visiting the coop and when it is arriving.
Knowing whether you are dealing with a raccoon, dog, fox, rat, or weasel will help you choose the correct trap and placement.
Using the Trap for Rabbits
A useful rabbit-catching method is to place the box in known rabbit country and make it resemble a natural hiding place.
Pile brush loosely over and around the trap while keeping the door and trigger completely clear.
Rabbits often enter dark tunnels and brush piles looking for concealment.
I also like to use two short pieces of scrap lumber as wings.
Place them in a wide V shape leading toward the trap entrance.
The wings help guide an animal moving along the edge into the opening.
In the right location, the trap may work without bait because the rabbit views it as shelter.
Do not expect immediate results.
Rabbits and other animals may need days or even a couple of weeks to become accustomed to a new object in their territory.
Sometimes it helps to leave the trap unset for several days with the door secured open. Once animals begin entering freely, set the trigger.
Pre-Baiting the Trap
Pre-baiting can improve success with cautious animals.
To pre-bait:
- Secure the door in the open position so it cannot fall.
- Place a small amount of bait near the entrance.
- Place a second amount halfway inside.
- Place the main bait near the rear.
- Replace the bait as needed for several days.
- Set the trigger after you see signs that animals are entering.
Signs may include:
- Missing bait
- Tracks
- Droppings
- Hair
- Disturbed leaves
- Trail-camera photographs
Check the Trap Frequently
A live-capture trap should never be set and forgotten.
Check it at least as often as local law requires and more frequently during:
- Hot weather
- Freezing weather
- Heavy rain
- Snow
- Direct sunlight
- Areas with dogs, coyotes, or other predators
I prefer checking traps early in the morning and again later in the day when practical.
Provide shade and weather protection without blocking ventilation or the door.
Do not leave a trapped animal exposed to the midday sun.
Handling a Captured Animal
Do not place your fingers through openings in the trap.
Wild animals that appear calm can bite or scratch without warning.
Raccoons, skunks, foxes, and some other mammals can carry rabies and other diseases.
Keep:
- Children away from the trap
- Pets under control
- Your hands away from the animal
- Your face away from the openings
Wear sturdy gloves when moving the trap, but do not assume gloves will prevent every bite.
If the animal is behaving strangely, appears sick, is unusually aggressive, is active at an abnormal time, or has bitten or scratched anyone, contact animal control, your local health department, or your state wildlife agency.
Any possible rabies exposure requires prompt professional medical guidance.
What Do You Do With the Animal?
That depends on:
- The species
- Why it was trapped
- The season
- Whether it is classified as game, a furbearer, protected wildlife, or nuisance wildlife
- State and local regulations
- Whether relocation is allowed
- Whether the animal appears sick or injured
Do not assume that you may drive a captured raccoon, groundhog, skunk, or other animal down the road and release it on someone else’s property.
Relocation can be illegal, can spread disease, can move the problem to another landowner, and may result in the animal dying after release.
Know the legal options before setting the trap.
When in doubt, contact your state wildlife agency or a licensed wildlife-control operator.
Recommended Reference
Affiliate disclosure: The following link is an affiliate link. I may earn a commission from qualifying purchases at no additional cost to you.
One useful reference on cage and box trapping is:
Being Kind to Animal Pests: A No-Nonsense Guide to Humane Animal Control With Cage Traps
by Steve Meyer.
The original edition is difficult to find, but used copies sometimes become available. A revised edition by Stephen M. Vantassel with Steve Meyer was published later and covers cage-trap selection, placement, baiting, and humane handling.
The Bottom Line
A homemade wooden box trap is not automatically better than a commercially manufactured trap.
In most cases, a good factory-made trap will be lighter, more durable, easier to carry, and more consistent.
But that does not make the homemade trap useless.
A wooden box trap teaches valuable skills:
- Basic woodworking
- Trigger construction
- Animal behavior
- Trail selection
- Baiting
- Trap placement
- Improvisation using locally available materials
It can also provide a practical, inexpensive way to protect a chicken coop, garden, or food supply.
Build one now.
Test it.
Learn how sensitive the trigger needs to be.
Learn how different animals react to it.
Do not wait until your chickens are disappearing or your family is hungry to start figuring it out.
The best survival plan combines modern equipment with the knowledge to improvise when that equipment is unavailable.
Have you ever built or used a wooden box trap? Share what worked—and what did not—in the comments below.
Trapping and Wildlife Resources
- Association of Fish & Wildlife Agencies: State Wildlife Agency Websites
- USDA Wildlife Services: Wildlife Damage Assistance
- CDC: Rabies Prevention and Wildlife Exposure
- Tennessee Wildlife Resources Agency: Wildlife Damage Control
- Tennessee Small-Game and Trapping Regulations
Legal and Safety Disclaimer
This article is intended for general preparedness, homesteading, woodworking, and historical trapping information.
Hunting and trapping laws vary by state, county, municipality, species, season, land ownership, and type of trap. Regulations may govern licenses, legal trap designs, trap identification, placement, bait, check intervals, possession limits, dispatch, transportation, relocation, and release.
Check the current regulations issued by your state wildlife agency before building, setting, transporting, or using any trap.
Never set traps where children, pets, livestock, protected wildlife, or the public could encounter them. Do not handle wild animals directly. Contact animal control, a wildlife professional, or the local health department when an animal appears sick, has bitten or scratched someone, or may have exposed a person or pet to rabies.
Discover more from The Survivalist Blog by M.D. Creekmore
Subscribe to get the latest posts sent to your email.
Leave a Reply