Preparedness can seem overwhelming when you are just getting started.
You watch a few videos, visit a couple of websites, and suddenly people are telling you that you need a year’s worth of food, a buried bunker, a $5,000 solar generator, night-vision equipment, a dozen firearms, and enough survival gear to outfit a small army.
Most beginners look at all of that, realize they cannot afford it, and give up before they ever get started.
That is the wrong way to approach preparedness.
You do not need to prepare for everything in one weekend. You do not need to go into debt, fill every room with supplies, or live in constant fear of what might happen next.
You need to identify the problems most likely to affect your family and begin reducing those vulnerabilities one at a time.
Preparedness is not about predicting the future perfectly. It is about making sure that a power outage, winter storm, job loss, water interruption, supply shortage, medical problem, or other emergency does not immediately turn into a personal disaster.
I have been involved in preparedness and self-reliance for decades. I have written books on the subject, operated preparedness websites, raised much of my own food, stored supplies, tested equipment, and made plenty of mistakes along the way.
The purpose of this guide is to help you avoid those mistakes and show you where to begin.
Start with what keeps you alive, then work toward what makes the situation more comfortable.
Preparedness Is Not About Being Scared
A lot of preparedness content is built around fear.
The title tells you that something terrible is about to happen. The thumbnail looks like the world is ending tomorrow. Then, once you are frightened enough, someone tries to sell you the product that will supposedly save you.
Fear may get clicks and sell products, but fear is not a preparedness plan.
Good preparedness should give you more confidence, not less.
When you know that you have water, food, lighting, medications, emergency cash, and a way to stay warm, you do not have to panic every time the weather forecast looks bad or the news reports another shortage.
You have already done what you reasonably can.
Preparedness should help you:
- Live through short-term emergencies safely
- Avoid unnecessary debt and financial hardship
- Depend less on stores and public services
- Protect your family from common disruptions
- Respond calmly instead of reacting out of fear
- Live better and often live cheaper
The same supplies that help during a major disaster can also help during a job loss, illness, unexpected repair, or temporary shortage.
Prepare for the Most Likely Problems First
Before buying anything, think about the emergencies most likely to happen where you live.
Someone living in East Tennessee has different concerns from someone living in coastal Florida, southern California, Alaska, or the middle of a large city.
Possible threats include:
- Power outages
- Winter storms
- Tornadoes
- Flooding
- Wildfires
- Extreme heat
- Water-main breaks
- Supply shortages
- Job loss
- Medical emergencies
- Vehicle breakdowns
- House fires
- Evacuations
- Economic downturns
- Civil unrest
- Longer-term national or international emergencies
Do not begin by preparing for the least likely and most dramatic scenario while ignoring the common emergencies that happen every day.
A family with a radiation detector, gas mask, and tactical gear—but no fire extinguisher, emergency cash, drinking water, or working smoke alarms—has its priorities backward.
Make a Simple Family Emergency Plan
Supplies are important, but your family also needs to know what to do.
Sit down together and answer a few basic questions:
- Where will we meet if we cannot return home?
- Who will pick up the children?
- Who will check on older or disabled family members?
- Where will we go if the neighborhood is evacuated?
- What route will we use if the main road is blocked?
- Who is our out-of-area contact?
- Where are medications, important documents, and emergency supplies kept?
- How will we communicate if cell service is overloaded?
- What will we do with pets or livestock?
Write important phone numbers on paper.
Most of us have numbers stored in our phones, but few people can remember those numbers when the phone is dead, broken, lost, or locked.
Choose an out-of-area contact. During a local emergency, it may be easier to reach someone in another state than someone across town. Family members can report their status to that person.
Give each capable family member a copy of the plan.
Step 1: Store Emergency Water
Safe drinking water should be one of your first priorities.
Food gets most of the attention because it is more interesting to buy and store. However, you will need water for drinking, cooking, brushing your teeth, taking medication, washing your hands, and limited sanitation.
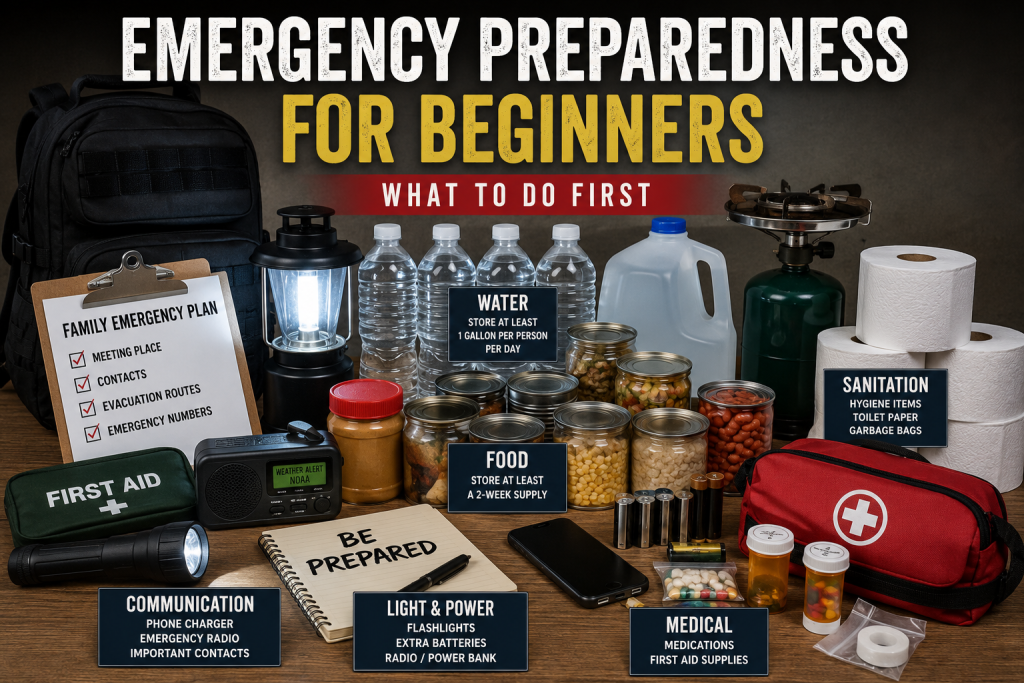
The basic recommendation is to store at least one gallon of water per person per day for three days. When space and money allow, work toward a two-week supply.
For a family of four, a two-week supply would be:
4 people × 14 days × 1 gallon = 56 gallons
That is a lot of water, but it shows why a single case of half-liter bottles is not a complete emergency water supply.
You may need more water for:
- Hot weather
- Pregnant or nursing women
- Illness
- Heavy physical work
- Pets
- Livestock
- Cooking
- Cleaning and sanitation
Good Water-Storage Options
- Unopened commercially bottled water
- Food-grade five- or seven-gallon water containers
- Food-grade 55-gallon barrels
- Heavy-duty portable water jugs
- Clean and sanitized two-liter soda bottles
Do not use old milk jugs for serious long-term water storage. They are thin, difficult to sanitize completely, and eventually begin leaking.
Store water in a cool, dark location away from gasoline, pesticides, household cleaners, paint, and other chemicals.
Write the storage date on home-filled containers and rotate them approximately every six months.
Commercial bottled water can usually remain usable much longer when it is stored correctly. You can learn more in What Is the Shelf Life of Bottled Water in Plastic Bottles?
Have More Than One Way to Treat Water
Stored water can run out. Containers can leak. A disaster may last longer than expected.
Have several backup methods:
- A gravity-fed household filter
- A portable filter
- A large pot and safe fuel source for boiling
- Unscented household bleach suitable for water treatment
- Chlorine-dioxide tablets
- Clean containers for collecting water
- Cloth or coffee filters for removing sediment before treatment
No ordinary filter removes every possible contaminant.
Water contaminated with gasoline, pesticides, industrial chemicals, radioactive material, or salt cannot automatically be made safe with a camping filter or by boiling it.
You can also build a gravity system using food-grade buckets and commercial filter elements. See How to Build a Homemade Gravity Water Filter.
Step 2: Build a Two-Week Food Supply
Do not begin by purchasing a year’s worth of unfamiliar freeze-dried food.
Start with two weeks of normal food that your family already eats.
Then expand to 30 days, 90 days, six months, and longer as your money and storage space allow.
Your first emergency food supply should include foods that:
- Have a reasonable shelf life
- Require little or no refrigeration
- Are easy to prepare
- Do not require excessive water or fuel
- Meet your family’s dietary needs
- Are foods your family will actually eat
Good Grocery-Store Foods to Begin With
- Canned meat
- Canned vegetables
- Canned fruit
- Soups and stews
- Peanut butter
- Crackers
- Oatmeal
- Breakfast cereal
- White rice
- Dry beans and lentils
- Pasta and sauce
- Powdered or shelf-stable milk
- Coffee and tea
- Cooking oil
- Salt, sugar, herbs, and spices
- Comfort foods
Do not overlook salt, cooking oil, spices, coffee, and familiar foods. A bucket of plain rice and beans may keep you alive, but eating the same tasteless meal three times a day will get old quickly.
Include foods that can be eaten without cooking in case you have no safe way to heat a meal.
Count Calories, Not Servings
Emergency-food companies like to advertise enormous numbers of servings.
A serving may be a small scoop of rice, powdered soup, or oatmeal. It may not be what most people would consider a complete meal.
Look at the total number of calories in the package.
A rough planning figure for four people eating 2,000 calories per day for two weeks is:
4 people × 14 days × 2,000 calories = 112,000 calories
Individual needs vary, especially for growing children, large adults, people doing physical work, and those exposed to cold weather.
Store What You Eat and Eat What You Store
Place newer food behind older food and use the oldest first.
This is called first in, first out, or FIFO.
Write the purchase date on cans and packages with a permanent marker. Check your pantry several times a year for damage, insects, leaks, rust, or spoiled food.
Once you have your everyday pantry established, begin adding dry staples packaged in Mylar bags with oxygen absorbers. See How to Store Dry Food Long Term in Buckets, Mylar Bags, and Oxygen Absorbers.
Step 3: Have a Safe Way to Cook
Stored food does little good if most of it requires cooking and you have no way to prepare it.
Possible emergency cooking methods include:
- Propane camp stove
- Butane stove
- Outdoor grill
- Rocket stove
- Wood stove
- Solar oven
- Fireplace designed for cooking
Never use a charcoal grill, outdoor propane stove, or gasoline-powered equipment inside your home, basement, garage, shed, tent, or other enclosed space.
Carbon monoxide is colorless, odorless, and deadly.
Store the fuel required for your cooking equipment safely and legally. Test the equipment before an emergency instead of waiting until the power is out to read the instructions.
Keep a manual can opener with your food supply.
Step 4: Prepare for Power Outages
Power outages are among the most common emergencies, and a long outage affects almost everything inside the home.
You may lose:
- Lighting
- Heating or air conditioning
- Refrigeration
- Internet access
- Well-pump operation
- Medical equipment
- Cooking appliances
- Some telephone service
- Security systems
Start With Simple Lighting
Every household should have:
- LED flashlights
- Headlamps
- Battery-powered lanterns
- Spare batteries
- Rechargeable lights
- Portable power banks
Headlamps are especially useful because they allow you to work with both hands.
Flashlights and battery-powered lanterns are safer than candles. Open flames can cause a house fire, especially when people are tired, distracted, or moving around in the dark.
Portable Power Stations
A portable power station can run or charge:
- Phones
- Radios
- Lights
- Laptops
- Some medical devices
- Fans
- Small electronics
Do not buy one based only on the large wattage number printed in the advertisement.
Determine how many watt-hours the battery stores and how much power your equipment uses. A power station that can run a lamp and phone for days may run an electric heater for only a short time—or may not run it at all.
Generator Safety
A generator can run larger loads such as a refrigerator, freezer, or well pump, but it can also kill your family if used incorrectly.
Operate portable generators outside only, at least 20 feet from the home and other occupied buildings, with the exhaust directed away from windows, doors, and vents.
Never operate one inside:
- A house
- A garage
- A basement
- A crawlspace
- A shed
- A porch
- A carport
Opening a garage door or window does not make indoor generator use safe.
Install working carbon-monoxide alarms inside the home.
Step 5: Prepare for Heat and Cold
Loss of heating or air conditioning can become more dangerous than the loss of lights.
Cold-Weather Supplies
- Warm sleeping bags
- Wool blankets
- Layered clothing
- Warm hats and gloves
- Insulated boots
- A safe backup heat source
- Carbon-monoxide alarms
- Fire extinguishers
Choose one room as the household’s warm room. Close off unused rooms, cover windows, and keep everyone together when practical.
Do not use an oven or outdoor cooking appliance to heat the home.
Hot-Weather Supplies
- Additional drinking water
- Battery-powered fans
- Window coverings
- Lightweight clothing
- Electrolyte drinks or oral rehydration supplies
- A plan for reaching a cooling center
Older adults, infants, people with chronic medical conditions, and certain pets are especially vulnerable to temperature extremes.
Step 6: Build a Practical Medical Kit
Do not buy a tiny $20 first-aid kit and assume you are medically prepared.
Most premade kits contain plenty of small adhesive bandages and very little for a serious injury.
A family medical supply should include:
- Prescription medications
- Copies of prescriptions
- Spare eyeglasses
- Thermometer
- Adhesive bandages
- Sterile gauze
- Medical tape
- Elastic wraps
- Antiseptic
- Burn dressings
- Disposable gloves
- Trauma shears
- Bleeding-control supplies
- Over-the-counter medications your family normally uses
- Oral rehydration supplies
- Dental-care supplies
- Information about allergies and medical conditions
Supplies without knowledge have limited value.
Take a first-aid and CPR class. Consider a recognized bleeding-control course. Learn these skills while instructors, emergency services, and hospitals are still readily available.
Do not attempt medical procedures beyond your training merely because you own the equipment.
Step 7: Plan for Sanitation
Sanitation is one of the most overlooked parts of preparedness.
A loss of water or sewer service can quickly create problems with toilets, garbage, handwashing, dishes, laundry, and personal hygiene.
Store:
- Toilet paper
- Soap
- Hand sanitizer
- Toothpaste and toothbrushes
- Dishwashing liquid
- Laundry detergent
- Heavy-duty garbage bags
- Disinfectant
- Unscented household bleach
- Disposable gloves
- Feminine-hygiene products
- Diapers and wipes if needed
- Pet-waste supplies
A simple emergency toilet can be made from a sturdy five-gallon bucket, a toilet-seat lid, heavy-duty liners, and absorbent material.
Know how waste will be stored and disposed of under local emergency instructions.
Clean hands are one of the most effective protections against illness. Set aside water specifically for handwashing and sanitation instead of assuming every stored gallon will be used only for drinking.
Step 8: Maintain Communication and Information
Information helps you decide whether to stay home, evacuate, boil water, avoid a road, or seek shelter.
Your communication supplies should include:
- Battery-powered or hand-crank emergency radio
- NOAA weather radio
- Portable phone chargers
- Charging cables
- Printed emergency phone numbers
- Printed local and regional maps
- FRS or GMRS radios where useful
- Whistle
- Paper and pens
Do not expect inexpensive two-way radios to communicate 30 miles through mountains, forests, and buildings merely because that range is printed on the package.
Test radios around your home, property, neighborhood, and normal travel routes.
Sign up for local emergency alerts and know which radio stations provide local information.
Step 9: Keep Emergency Cash and Protect Documents
Preparedness is not only about supplies.
An emergency fund may be more useful during a job loss, vehicle breakdown, medical expense, or major home repair than another closet full of gear.
Keep some cash at home in small bills. During a power or internet outage, cards and electronic payment systems may not work.
Do not keep all your money at home. Theft, fire, or another disaster could destroy it.
Protect copies of:
- Identification
- Insurance policies
- Property records
- Vehicle titles
- Medical information
- Prescription lists
- Bank and credit-union information
- Emergency contacts
- Wills and powers of attorney
- Pet vaccination records
Keep paper copies in a waterproof and fire-resistant container. Maintain encrypted digital backups where appropriate.
Step 10: Improve Basic Home Safety and Security
Security begins with ordinary measures that make your home safer every day.
Check:
- Exterior door frames
- Locks and strike plates
- Window locks
- Outdoor lighting
- Smoke alarms
- Carbon-monoxide alarms
- Fire extinguishers
- Escape routes
- House numbers visible to emergency responders
Keep trees and shrubs trimmed so they do not provide concealment near doors and windows.
Do not advertise your stored supplies. There is no reason for the entire neighborhood or everyone online to know what you have or where it is kept.
Firearms may be one part of a lawful defensive plan for trained and responsible adults, but they do not replace locks, lighting, awareness, avoidance, or secure storage.
You can read more in The Prepper’s Practical Firearms Guide: What You Need and What You Don’t.
Step 11: Prepare to Leave Home
Most emergencies are better handled by staying home when the house is safe.
Your home contains your food, water, clothing, tools, shelter, and other supplies. Leaving all of that behind should not be your first response to every problem.
However, some situations require evacuation:
- House fire
- Wildfire
- Flooding
- Chemical spill
- Gas leak
- Structural damage
- Mandatory evacuation order
- Immediate danger from violence
Each family member should have a practical evacuation bag containing:
- Water
- Ready-to-eat food
- Medications
- Flashlight
- Phone charger
- Change of clothing
- Rain gear
- Basic hygiene supplies
- Copies of important documents
- Cash
- First-aid supplies
- Local map
- Personal necessities
Keep the weight reasonable.
A 70-pound pack filled with survival gadgets is useless to someone who cannot carry it beyond the driveway.
Know where you would go. “Heading for the woods” is not a complete evacuation plan.
Step 12: Equip Your Vehicle
Your vehicle may be where you are when the emergency begins.
Keep a basic kit containing:
- Drinking water
- Shelf-stable snacks
- First-aid kit
- Flashlight
- Phone charger
- Jumper cables or jump pack
- Tire-pressure gauge
- Air compressor
- Basic tools
- Work gloves
- Rain gear
- Blanket
- Seasonal clothing
- Paper maps
- Cash
Adjust the kit for the season and your location.
A winter vehicle kit in the mountains should look different from a summer kit in the desert.
Do not leave medication, batteries, food, or water in a hot or freezing vehicle indefinitely without inspecting and rotating them.
Remember Children, Older Adults, Pets, and Medical Needs
A generic emergency checklist does not know your family.
Add supplies for:
- Infant formula
- Diapers
- Special dietary needs
- Food allergies
- Diabetes
- Mobility limitations
- Hearing or vision needs
- Medical devices
- Service animals
- Pet food
- Leashes and carriers
- Livestock feed and water
Do not assume that shelters, hotels, or relatives will automatically accept every pet or provide specialized medical supplies.
Skills Matter More Than Gadgets
Equipment can break, run out, get lost, or become obsolete.
Useful skills stay with you.
Learn:
- First aid and CPR
- How to shut off household utilities
- How to cook without electricity
- How to filter and disinfect water
- How to grow food
- Food preservation
- Basic home repair
- Basic vehicle maintenance
- Fire safety
- Radio communication
- Navigation with a paper map
- How to use every piece of emergency equipment you own
Do not wait until the lights go out to open the box and begin reading the instructions.
What Beginners Should Not Waste Money On
Beginners often spend too much money on exciting gear and too little on boring necessities.
Do not begin with:
- A giant collection of survival knives
- Several expensive firearms you rarely shoot
- A year of unfamiliar emergency meals
- Military-style equipment you do not know how to use
- A generator before determining what you need to power
- An oversized solar setup purchased without calculating electrical loads
- Cheap gadgets promoted as solutions to every emergency
- Seed vaults when you have never grown a garden
- Medical equipment beyond your training
Start with water, food, medications, lighting, sanitation, communication, emergency savings, and basic household safety.
The boring supplies will probably be the supplies you actually use.
A 30-Day Beginner Preparedness Plan
Week 1: Make a Plan and Cover Three Days
- Write a family emergency plan.
- Store three days of water.
- Store three days of easy-to-prepare food.
- Buy flashlights and spare batteries.
- Check smoke and carbon-monoxide alarms.
- Gather medications and basic first-aid supplies.
- Set aside a small amount of emergency cash.
Week 2: Expand to Two Weeks
- Expand water storage toward two weeks.
- Build a two-week food supply.
- Buy a gravity filter and backup treatment method.
- Add hygiene and sanitation supplies.
- Buy an emergency radio and power banks.
Week 3: Prepare for Power and Evacuation
- Choose a safe emergency cooking method.
- Add lighting and charging options.
- Create evacuation bags.
- Build a vehicle kit.
- Protect copies of important documents.
- Improve door, window, and fire safety.
Week 4: Test the Plan
- Turn off the main electrical breaker for one evening.
- Cook a meal using emergency equipment.
- Use only stored water for several hours.
- Test flashlights, radios, and phone chargers.
- Practice opening emergency storage and equipment.
- Identify what you forgot or what failed.
A practice outage will teach you more than buying another box of equipment.
Preparedness on a Small Budget
You do not have to be wealthy to begin.
Buy one or two extra shelf-stable foods during normal grocery trips. Set aside a few dollars each week. Look for sales, but do not buy food your family will not eat merely because it is cheap.
Many important preparations cost little or nothing:
- Writing a family plan
- Organizing important documents
- Learning how to shut off utilities
- Rotating pantry food
- Testing smoke alarms
- Downloading local maps
- Taking inventory
- Learning basic skills
- Getting to know dependable neighbors
A paid-off home, dependable vehicle, emergency savings, practical skills, and a deep pantry may do more for your long-term security than a building full of expensive survival gear.
Maintain What You Build
Preparedness is not something you finish and forget.
At least twice each year:
- Rotate food and water.
- Check expiration dates on medication.
- Test flashlights and radios.
- Recharge power banks and power stations.
- Inspect batteries for leakage.
- Test smoke and carbon-monoxide alarms.
- Update emergency contacts.
- Replace children’s outgrown clothing.
- Review pet supplies.
- Inspect vehicle kits.
- Test generators and other equipment safely.
Preparedness supplies should be used, tested, maintained, and replaced when necessary.
The Bottom Line
Emergency preparedness does not have to be complicated.
Begin with the things that keep your family alive and functioning:
- Make a family plan.
- Store water.
- Build a two-week food supply.
- Prepare for power outages.
- Store medications and first-aid supplies.
- Plan for sanitation.
- Maintain communication.
- Keep emergency cash and protect documents.
- Improve basic home safety.
- Prepare to evacuate when staying home is no longer safe.
Do not try to buy everything at once.
Start with three days, build toward two weeks, then expand as your budget and storage space allow.
Preparedness is not about predicting the exact disaster, impressing people with your equipment, or living in fear.
It is about reducing your dependence on systems that can fail and giving your family enough time, supplies, and knowledge to make good decisions when something goes wrong.
Do one useful thing today. Store a few gallons of water. Buy extra food. Check the smoke alarms. Write down emergency phone numbers. Put a flashlight beside the bed.
Then do something else next week.
That is how real preparedness is built—not in one expensive shopping trip, but one practical step at a time.
What was the first thing you did when you started preparing, and what advice would you give someone who is just beginning? Add your thoughts in the comments below.
Discover more from The Survivalist Blog by M.D. Creekmore
Subscribe to get the latest posts sent to your email.
Leave a Reply